Google Friend Connect

Search This Blog

Monday, April 11, 2011

Amazing Animals - No, Not The Kids

A few weeks back, the wee ones and I tried out a cookie making kit with less than stellar results.  The company, Brand Castle, quickly sent us a new kit to try.  Not only does this speak to the pride this company takes in its product and its reputation, it also tells me that they take the time to listen to their consumers.  I like that in a cookie maker.

This is what we were sent.  This is one of the company's deluxe, Crafty Cooking Kits.  The box even came with a nifty carrying handle.  One thing the company does exceptionally well, without fail, is their packaging.

Every inch of the box is covered in colourful pictures and words.

It even has this cool word search.  Hey, if you're going to print up a box for kids, print up a box for kids.

At each step, there are separate instructions for kids and adults.  The energy miser within me still balks at turning on the oven to preheat before you even wash the cookie cutters, but I think we can all agree that's probably just my own personal quirk.

When you open the box, you find all this good stuff. Even the paint brushes are there!

And yes, that is my daughter, sitting on the counter.

Into the bowl you dump the cookie mix and an egg.

Then add four tablespoons of butter.  For convenience, I used 1/4 cup of butter.  Hardy har har.  Just a little baking humour there.

Sorry, I'll move on.

The mixture starts out crumbly, but quickly converges into a nice ball at the bottom of the bowl.

Plop it out onto a well-floured surface.

The kids readied the cookie cutters.

I think half the fun may have been the cookie cutters.

The dough needs to be rolled out to approximately 1/16" thickness.  Here, E3 demonstrates good rolling form.  And yes, E2 is wearing a pink shirt and red pants.  She dresses herself.  I ask no questions.

You get six different wild animal cutters with the kit.  The giraffe turns out a bit narrow, so you have to be careful with him, so he doesn't break.  I never did get the hang of leaving Leo with a tail.  Not to worry, he's plenty cute and fun without his tail.

The box never did say how many cookie to expect.  I ended up with nineteen.

And this tidbit left over.

After a swift 10 minutes or so in the oven, they are ready for the cooking rack.

The surface texture (and cookie taste) comes very close to a homemade sugar cookie.  Just with considerably fewer ingredients to add.  I like that.

Baking and cooling take just enough time to get everything cleaned up and move on to round two:  icing.

The packet of icing that comes with the kit needs to be kneaded (ha!  I have always loved that line).  Then you get to use all of your piano finger strength to squeeze it out of the packet and into a bowl.  I don't know exactly, but it is some type of royal icing that hardens quickly.  Be sure to wash out the bowl immediately after use.  Otherwise, a jackhammer may be required.

This is a shot of my ultra professional icing job. Looks just like the box, right?

Right?


After the cookies dry for a half hour or so, you get to break out these.  This is edible paint.  It reminds me of the old Q-tip boxes my mom used to get and my sister and I fought over.  The ones where the package had paint squares on them and the idea was to use dampened Q-tips to colour the picture that was inside the Q-tip carton.  Am I dating myself here? Someone please, tell me I am not alone...

This is where I haul in the troops.  After school at our place can be incredibly quiet or something akin to a mad house.  Today, the madhouse was highly occupied, painting cookies.  Don't worry - only three of these are mine.  The prospect of painting food was intriguing enough to get everybody off the bus, in the door, out of their coats, and to the table with washed hands in record time.

This one missed the memo about painting his cookie first.

They all had tons of fun painting their own creations and showing them off to their parents when they went home.  I really would recommend waiting the full half hour to make sure the icing has hardened.  Otherwise, little paintbrushes held by little hands tend to break through the icing 'crust' and cause a bit of a problem.

By the end of the night, I was left with this:  the plastic tray it all came in.  It is a really sturdy tray that I am thinking of re-purposing as a drawer organizer.

All in all, I gotta say, I really liked this cookie kit.  And not because Brand Castle sent me a freebie.  Not too much extra stuff to add, no complicated directions, and the cookies tasted good.  The Brand Castle website lists retailers that carry the kits in the US.  For Canada, I may have to do a little retail investigation to figure out where to find them.

I'll get back to you and let you know what I find.  In the meantime, always wear your oven mitts.  It is crucial for cuteness.

1. 2.
Share/Save/Bookmark 3.

Friday, April 8, 2011

No Utensils Required

A friend of mine spent the day in our chaos today.  Michelle brought along her adorable little girl, Paisley Violet, to spend the day, too.  Mama even left me with her for A WHOLE HOUR.  Michelle should count herself lucky that I did not pack the truck, load up all the kids, and head for parts unknown, this baby is so cute.  I mean, seriously, look at her:
Those cheeks!  Those eyes!  Those pudgy little fingers!  I could just eat her up with a spoon!

Paisley and her mom hung out at our house pretty much all day.  That she put up with the sheer volume from and quantity of kids in our abode is nothing short of a small miracle.  Today is a PA or PD or something-or-other no school day today.  This means this joint was overflowing with small people.  Seven, plus darling Paisley in fact.  The eldest of this nut bunch will be six this spring.

Please pass the smelling salts and the chocolate.

I fed this crew what every other red-blood, sane (?) mother with access to the bread outlet store would:  grilled cheese and grapes.  That they dipped their grapes in the ketchup can be discussed with their therapists and nutritionists at a later date.

After the dust settled, Michelle and I decided to eat.  In a small act of wonderment, I had kind of planned ahead.

Remember that birthday money I got a bit ago?  It is being well used.  Well used.

I done bought myself one of these.  I've been Jonesin' for one for a while now.  I was going to get one last winter, but they sold out at Costco before I got back to get one.  When they showed up again this year, I waited just long enough for the birthday money to roll in, then rolled it right back out.  These are not incredibly expensive, about $30, and I do find it more versatile than an electric press. It did come with a bit of a learning curve, but that just provided more opportunities to eat the less than stellar results. 

Wouldn't want to feed company second rate sandwiches, now would we?

It stacks nice and neat together.  The interior surface is pretty easy to clean and maintain and does not require seasoning.  And it's shiny.  And it's red.  I like that in a kitchen accessory.

The box mentions that you can grill chicken breast and steak, as well as traditional sandwiches.  I have tried the steak and still find that I prefer them on the BBQ.  They are still good, but I am sure that I would be far more open to the idea in, say, January, when the BBQ is covered in several feet of snow.

If food oozes and gets stuck on the pan or the press, I just heat it up and let it bake off.  I'm not sure that's what the manufacturer recommends, but since I am dish averse, that's where we're at.  If I hear that they really pooh-pooh that idea, I'll be sure to update here.  In the meantime, to heat up both the press and the pan, you can put them together on an element or burner and have the patience to let the heat transfer to both pieces.  Or, you can be like me and have little time or patience and heat up both piece individually on separate elements or burners so they are ready faster.  If you use this method, start them as you are assembling your sandwich and the pieces will both be ready by the time your sandwich goes to press.  Hardy har har

I couldn't find panini bread in my little grocery store, currently under massive renovation and re-branding, but I did find this.  I will admit, the plain ol' naan bread is OK.  It's more OK if you gently heat it in the oven with some butter on it.

But the caramelized onion naan.  Oh, man.  This stuff is the shezam.  And it makes the perfect grilled sandwich bread.


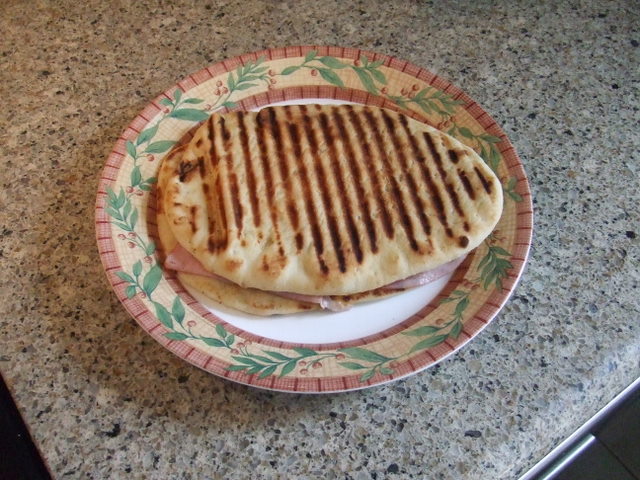
Start with two pieces of the naan bread.  Turn them singed side up.  They won't be exactly the same, but that's kind of the point of commercially authentic bread.
 Add enough cheese to cover most of the surface.  Our fromage of choice today was Swiss.  Be sure to add cheese to both sides.

Then add 2-3 slices of luncheon meat or any other thinly sliced meat.  The sauce today?  Honey mustard.  And not just any honey mustard.

This little bit of golden elixir is hard to find in my neck of the woods.  Oh, sure, you can find the tartar sauce, or plum sauce, or even the hot apple cider mix. But not the honey mustard.  It is such a well loved, rare commodity here that it is actually permanently on my Christmas wish list.  And my children's wish list as well. Yes, we start brainwashing, er, training, early around here. Oddly, the site lists a number of suggested uses for the stuff.  Eating with a spoon is not one of them.  I sense a web edit coming up.

Put it together, butter both sides, slap it 0nto the grill, give it a couple of minutes and bingo, you have a delicious, hot, melty, cheesy sandwich that would probably cost you an hour's wages at your nearest bistro.  Add some chips and homemade pickles and you've just upped your savings by a good three bucks a plate.  Especially if you cut it on the diagonal.  That always seems to cost more.

What, you don't have homemade pickles on hand either?  What is this world coming to?  Seriously.


Disclaimer:  None of the companies mentioned in this here blog post know a thing about me.  If MBAMamaMusings blew up into a bazillion fragmented pieces, neither Sobey's, Lynch's, Heritage, nor Costco would give two fiddlers. 1. 2.
Share/Save/Bookmark 3.

Thursday, April 7, 2011

Tidbit Thursday

In the blogger world, there is now something called Wordless Wednesday.  The idea is that bloggers can post an intriguing photo on their site and not have to say, er, type, a word.  Fun for the readers and a bit of a break for the blogger.  Since I have not, as of yet, run out of things to say, I have no participated.

Call me a spoil sport.

At any rate, I am hereby declaring the fourth weekday to be Tidbit Thursdays on this site.  And if it catches on elsewhere, I won't even ask for a royalty.

Maybe just a shout out.  That might be nice.

So, without further ado, here is today's life altering tidbit

Big hairy deal, you say.  It's a pan of overcrowded chocolate chip cookie dough balls.  Be still my heart.

No so fast there, compadre.

What you actually see here is the ticket to selling your home faster, the key to filling up the bottomless pit that is your teenager, and the magic button to making last minute hostessing look like a breeze.

These little suckers are frozen.

You heard me, frozen.  Ready to be baked and served warm, ready to fill your home with the aroma of homey goodness, ready to be devoured.

Scoop as many as you can fit onto a cookie tray and lay it in the freezer.  If you don't have a deep freeze, a plate will do.  I would recommend having parchment, wax paper, or foil on the tray to make removal easier.

Once they are good and frozen, pop'em in a zip top bag and have them on hand for whatever baking/food/home selling emergency may come into your life.  Oh, and keep them in the freezer.  And do not succumb to the evil practise of eating raw cookie dough.

Bake them from frozen, just expect it to take a few minutes longer than it would if they were fresh.

Disclaimer:  I have shamelessly stolen this idea from my old friend, Anita.  Not that she is old, but rather that we have known each other now for 12 yeara.  She and most of her family stood in our wedding.  She now lives in another country, although we now live within local calling distance of her parents.

I don't know why you'd need to know that last part.  In fact, you probably don't.

Anyhoo, she uses this idea to feed her four spawn when they return from school and as a way to get them to all it down together in one space long enough to actually tell her about their day.  Truly an ingenious plan. 1. 2.
Share/Save/Bookmark 3.

Wednesday, April 6, 2011

Girl Scount in Action - NOT

Being that I am always prepared for 6 pm to roll around, I never need to dip in to those quickie recipe files.  I also have swampland in Florida for sale, in case you are interested.

I was vaguely prepared for this evening's first course.  I had brought some chicken out of the freezer. That counts, right?

I threw said chicken quarters with backs attached into my trusty cast iron dutch oven - the one that weighs a ton but never lets me down.  I gave my rosemary plant a hair cut and dropped that in the pot as well.  Then I hacked up and onion, threw in a few gobs of butter, a little salt, a little pepper, and bingo!  Main course.  I cooked it at 350 for about an hour and we were good to go.  I removed the lid for the last few minutes to give it a nice roasted skin.

The house smelled fantastic.

To finish this evening's main course with a real sense of flair, I thickened up the butter, onions, and rosemary that were left in the dutch oven and and I instantly looked like a rock star.  Or maybe that I played one on TV.  OK, OK, I pulled a meal together.  No one will ever confuse me with a rock star.  Trust me.

While I was spending too much time patting myself on my back for my ingenious endeavour, my lack of dessert suddenly hit me.  In some households, this might not be such a big deal.  Where I come from, meals did not end without dessert.  Homemade dessert.  Maybe you could get away without serving dessert at noon hour, but never at the supper hour.  Immediate action was required.

Ever pick up those little pamphlets in the grocery store and stick them in your purse, after having perused for coupons?  Then find them forgotten several days, weeks, or months later?  Well, I finally read one of those today and we are all glad I did.

One can of sweetened condensed milk.  One of my great-grandmothers used to use in her coffee.  Before the days of flavoured sweeteners, this was an unheard of luxury. 

The recipe booklet calls for 600 g of frozen strawberries.  The strawberry season was poor here last summer and I didn't get any in.  I did get in raspberries though.  I'm not exactly sure how many cups 600 g is, but I went with something like 2 cups.

And last but not least, citrus zest.  This is again where the handy dandy frozen zest was a life saver.  It calls for 2 tsp of lime, but I had lemon so lemon it is.

Plop it all in your nearest blender.  I'd imagine your local food processor would also work.

And this is what you get.  Freeze it for at least an hour.  It will scoop out softer than regular ice cream and is considerably richer.  The citrus zest is definitely needed to cut down on the sweetness.  Small scoops of this with cookies and tea and dessert is served. 1. 2.
Share/Save/Bookmark 3.

Tuesday, April 5, 2011

Supper in a Flash

At 3 o'clock today, I had neither dessert nor a final vegetable ready for supper tonight.  By 3:20, I had dessert in the oven.  The final side was ready in under 15 minutes.  Now that's what I call convenience food.

I receive regular blog updates from SugarCrafter.  Not only does she make fantastic desserts and sweets, she also posts some pretty nifty main course and side dish ideas.  This one definitely caught my eye.

Chop up a few slices of bacon (I used 5).  Fry it up with a roughly chopped onion and then some minced garlic. Half or quarter some brussel sprouts (depending on size) and toss into the mix.  Let it saute up until the sprouts are bright green and slightly browned on the edges.  I finished it with a little balsamic vinegar and bingo, vegetables were served.  The sprouts were neither bitter nor soggy.  My kids, who are brussel sprout eaters to begin with, practically inhaled these.

Now, for some dessert.

Last summer, one of my aunts had a bumper crop of blackberries.  I had never really done much with blackberries per se, but what the heck.  They came picked, packed, and frozen - who was I to argue?

Into the oven safe dish went the berries, some brown sugar, corn starch, and some cinnamon.  Cinnamon gives it a little kick and marries nicely with the crisp topping, as well as offering a continuity of flavour.

I also toss in a little secret ingredient - lemon zest.  Not being one to bother zesting a lemon every time I need some, I just zest up a whole lot of them at once or when I've used the juice from a fresh lemon.

Then I put the zest into these little portion cups and label how much zest I've put in there. Next time I need zest for something, I've got it.

The zest does clump together a bit, but it is easily broken up with your fingers.  I'm sure Martha would tell you that it is not the same as fresh zest and I'm equally sure she would probably be right.  But I'm bettin' it's a ton better than artificial flavouring or bottled juice.  And way cheaper than employing a sous chef.

Give it all a good stir and you are halfway there.  The beauty of making a crisp is that you can use frozen berries.  No need to plan ahead!  Let's hear it for procrastination!

Next, take a little butter.  Please, don't use margarine or attempt to use olive oil.  And this is certainly no place for lard.

Nuke it to melt and then toss in a little brown sugar.  Resist temptation to begin eating now.

Then some oats, flour, chopped pecans and some cinnamon.  Remember what I had said earlier about continuity of flavours?  You don't?  Not to worry.  I'm used to it.  My kids never remember what I say either.  If you want to get fancy schmancy, toast the pecans before adding them in.

Dump it evenly on top of the frozen berry mixture and away you go into a 350 F oven.  With frozen berries, count on about an hour to bake.  You'll know it's done when the juice starts bubbling through the crisp part.

It will look kinda like this.  You can turn off the oven and let it sit in there to stay warm through the main course and then serve it.

Serve it with vanilla ice cream or whipped cream or even whipped cream out of a can, if you must.  Tonight, we must-ed.  I am plumb out of whipped cream and our ice cream reserves are dangerously low.

So there you have it.  Half your meal is ready for you in less time (and with considerably less expense) than it would be to get take out.  And way tastier, I might add.

Just ask this guy:

1. 2.
Share/Save/Bookmark 3.

Monday, April 4, 2011

Butterscotch Spice Cookies

I have begun to get regular e-mail updates from Pinnacle Foods, maker of Duncan Hines products, among other things.

Another gem arrived today.  This one, just in the nick of time.  The bus stops at our house at 3:45.  It was 3 pm.  The cookie jar was woefully empty.  What to do?

In a pinch, and for the sake of time and the reduction of mess and dishes, I am a big fan of starting with a mix and then going from there.  In this case, Butterscotch Spice Cookies were up to bat.  Simple pimple these are, let me tell you.  And ready by the time the bus pulled up and the kids tumbled out.

Start with this handful of ingredients and some oil.  You'll need to use your imagination here.  The oil was absent for the class photo.  Dump the spice cake mix, two eggs, a teaspoon of vanilla, and 1/2 cup of vegetable oil in and set the mixer to whirl about.

It definitely will not be confused with cake mix at this point.  Very heavy and very glumpy.  Resembles really heavy kindergarten paste, only tastier.  Or at least, this is what my quality assurance man tells me.

Dump in the butterscotch chips and mix it all up.  I kind of went overboard here on the chips and probably shouldn't have.  The dough can really only hold about a cup of chips.

They look a little shiny and feels a tad oily.  You can see where too many chips would become problematic here.

And here are the cookie balls, all lined up in pretty little rows.  The recipe tells you it makes three dozen cookies.  I ended up with 42 decent sized cookies.  Now, I'm not pointing fingers or anything, but maybe Mr. Hines is bad at math.  Or just likes huge cookies.  I am not here to judge.

At any rate, they pretty much filled up the cookie jar in under half an hour, including baking time.  They only bake for 8-10 minutes, and collecting the ingredients probably takes about as much time as actually mixing them together.  Or at least it does in my house.

Anyways, this makes a quick cookie to have on hand for after school or to send to the class bake sale, or when you have forgotten that today is church potluck.  Not that I've ever been in that predicament.


**This is my own review.  Pinnacle Foods and Mr. Hines have no idea who I am.  If I were to succumb to a horrible rolling pin accident tomorrow, they would shed no tears. 1. 2.
Share/Save/Bookmark 3.