Google Friend Connect

Search This Blog

Monday, February 28, 2011

NoodleHead

Many a night, Goose and I need to eat something after the wee ones are in bed.  Popcorn gets old and isn't actually filling in the long run.  Chips and dip will fill you both up and out.  Nachos and homemade salsa are fantastic, but after a while I fear I may begin looking like a nacho.  One day, after just such a dilemma, again, I stumbled upon a few recipes for Asian Sesame Peanut Noodles, or some variant thereof, and created this little number.

You will need a few simple pantry ingredients.  Before starting the sauce, get a big ol' pot of water boiling.  But don't watch the pot, it will never boil that way.  Make the sauce instead.

Break out your favourite sunflower bowl and plop in some crunchy peanut butter.  How much you add is dependent upon how much you like peanut butter, whether or not the full moon is in its third house, and whether or not you need to use up that particular jar.

Throw in a few other tasty ingredients:  rice wine vinegar, low sodium soy sauce, and sesame oil.

Give it a good wisk about.  You can also cheat a little and add an Asian Sesame salad dressing to the mix.  At this point, it may be a little thick.  This mixture is.  Add a splash of water and stir thoroughly.  You want it runny enough to coat the noodles easily.  This is more of a spread on your morning toast consistency and won't do at all.

Now, for these little gems.  Whole water chestnuts.  Often sold in the Asian foods aisle.  Drain them off.

Divide them into the serving bowls like so.  They will warm up enough once the hot noodles are tossed on top.

Now, young samurai, for the noodles.  For years, I passed these little babies by while cruising through the grocery store.  Well, no more!  Each package of 3 minute chow mein noodles contains about 8 of these little sheafs.  Or at least, that's what I call them.  They remind me of hay sheafs.  You know the plate-like sections of hay that are packed together and tied into a bale?  No?  Are my roots showing again?  Sheesh

Anyways, 4 of these sections make a full meal for Goose and I.  That's two full meals per 99 cent package.  Not bad at all.

Boil them as per the package directions.  Mine all say 3 minutes.  No more, no less.  Not following directions would generally mean the noodle Nazis come for you.  And no one wants that, now do they?

On a semi-serious note, it is important to cook these long enough, but not too long.  Leave the crunch to the nuts and the water chestnuts.

Add them to the bowls and give them a good toss.  This will evenly coat them with the delicious sesame, peanuty sauce.

I like sesame seeds added on top.

Goose prefers a little heat, usually in the form of hot chili flakes.

If you'd like to up the protein quotient, feel free to toss into some shrimp.  I add mine into the boiling noodle water for the last 30 seconds or so, just long enough to heat them through.  If you want to get all fancy pants and use raw shrimp, I'd suggest boil them in the water after you remove the noodles, to ensure they are properly cooked and the noodles don't get overdone.

And there, voila!  A tasty, healthy supper in 15 minutes or less.  Now excuse me, I think I hear Ms. Ray calling...
1. 2.
Share/Save/Bookmark 3.

Friday, February 25, 2011

The Apron Saga - Part Deux

It is finished!

At least the apron part.  And with several hours to spare, I might add.  E2's birthday isn't until tomorrow, you know.

The apron saga has not actually been too bad, so far.  I'm pretty impressed with myself.

Once I conceded that I would just have to hand gather the ruffle, things were rolling right along.

The ruffles actually turned out pretty even, too.

The pockets, however?  They took minutes off my life.  Maybe even an hour.

What I thought was a fairly smooth and even rounded edge wasn't so much so.  At least once I turned the pockets right side out.

This stuff here is a life saver.  Snip off a piece of this tape-like stuff, iron it down, peel off the paper, stick the second piece of fabric to it, and poof!  A forever seal.

After spending agonizing, grueling minutes attempting to perfectly align the non-uniform pockets, I again deviated from the instructions  Shocking, I know.  I had the audacity to machine stitch the pockets right onto the front panel of the apron, instead of the baste stitch it calls for after the whole thing is put together.

Next, I had to mentally wrap my head around where the neck and waist ties would need to be on the finished product, so I could figure out where to place them on the unfinished product.  Got that?

Looks a bit interesting right now.

Then for the pretty pink lining.  We are getting close.

Pins.  Lots and lots of pins.  Except I put them on the wrong side, which made sewing just a leetle bit tricky.

Now it is time to snip!  But carefully, lest I undo my hard work.

It is important to make these little snips anywhere there is a rounded edge to be turned.  Otherwise it bunches and puckers and just looks messy.  And who wants a messy apron?  Hmm?

Square corners also need to be trimmed on a 45 degree angle.  This will ensure nice, sharp corners.  Once you use your seam ripper and paper boner to poke out the corners.  Try to avoid bleeding on your almost finished project.  It will make you cry.

Once it's folded right side out, time for a leetle trip to Mr. Iron, where we'll press under a hem.

Nice and even all over.  Ready to be stitched!

And - ta da!  A lovely little apron for my lovely little girl.

 Here we have the back of the ruffle, all nice and neat.

 And the, er, pockets.  Which, in hindsight, I sewed on backwards.  The cup handles probably should have been to the inside.  On the plus side, I did remember to do the little triangle stitch thingy in the corner.  This builds a stronger pocket. Something that will certainly come in handy when carrying around ponies.
 The bottom front of the ruffle is just a tad uneven.  This is what homemade is all about.  Or at least, this is what I tell myself.
But the neckline is nice and smooth.  Look at it, a snipped piece of perfect.  Say that three times fast.

And there we have it.  And now, off to wrap a couple of Lalaloopsy dollies and a Barbie shirt.  Heck, I've got a few hours to spare.  Why rush it?
1. 2.
Share/Save/Bookmark 3.

Thursday, February 24, 2011

What to do when you don't know what to do

So, it's four o'clock.  Supper is soon.  No meat was extracted from the deep freeze for this meal that has clearly snuck up on you, out of nowhere.  Kids are home from school.  Chaos, not cuisine, is reigning supreme at your home(quick name that FoodNetwork show!).  What to do, what to do.

Do this.

Make a quiche.

Yikes!  Sounds scary!  How ever will I pull it off?  Where will I find the ingredients?  Isn't that a fancy shmancy French dish? What is the meaning to life?

Enough already.  Here we have life's problems solved with pie plate and a box of eggs.  Or, at least a really good start on it.

Remember the perfect pie crust?  Well, here is a perfectly good use for it.

Take your basic pie plate.  Anyone will do.  This little number is a honeymoon gift from Goose to me.  It came with four matching mini-pie plates.  Not that you actually need that information.  Nor do you need to know that we honeymooned 10 minutes down the road from where we now live.  True story.  Not a word of a lie.

ANYWAYS

Roll out your pie crust and fill your pie plate.  I love this particular pie plate because the edges are already fluted, thus giving the illusion that I actually know how to do something like that.

Then pop it back in the fridge to keep it cool  No need to cover it, it won't be in there that long.

OK, OK, if you don't have pie crust on hand (who are you?  Do I know you?) go ahead and use a frozen one.  I won't tell.

Fry up some bacon.  Here's an old family secret:  bake, don't fry.  Technically, it will be baking in its own grease, which probably means its still frying, but whatever. 
Second family secret: line it up on a foil covered rimmed baking sheet.  Clean up will be a breeze and the bacon pieces will come out nice and straight and even.  I bake at 350-400F until desired doneness.  My mother broils.  Depends on how much of a hurry you are in.  I like the baking method, as I like crisper bacon.

See - like this.  All crisp and beautiful

This makes it a snap to use later for sandwiches and general gnashing.  It also makes it much easier to chop up, if your recipe requires.  This will keep in your fridge a considerable length of time.  As in, a week or more.  Not that it ever lasts that long around here.

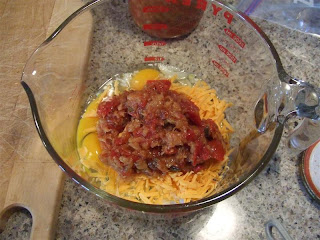
So, you take some eggs.  For a deep dish pie plate like the one I used, I'd suggest something in the neighbourhood of half a dozen eggs.  Finely chop up some onion and toss it in there.

Next comes some grated cheese.  The sharper the better.  Again, it's to taste, but I'd recommend something in the 3/4 cup range.

Next - zee seeecret ingreediant! Salsa!  If you have a juicy salsa, I'd recommend draining it.  Too  much moisture just doesn't work here.  I'd say about 1/2 to a full cup.  Crumble in as much bacon as you'd like.

**Helpful hint - you can also use the pre-cooked, pre-crumbled bacon, but I don't find it has quite as much flavour.  Or, if you need to make it for those vegetarian weirdos, omit it all together.

Next, give it a good wisk about.  A wisk really is the weapon of choice here.  We are dealing with eggs after all.  Then add some milk, enough to reasonably fill the pie plate you are working with.  For me, that was up to the 6 cup mark.
Then, pop it into your chilled pie crust.  Note that the quiche mixture doesn't go all the way to the top of the pie plate.  Egg pouf and need room to work.  And hey, nobody likes to be crowded in a hot space.  Just leads to bad endings.

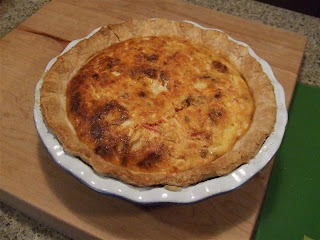
Then, pop it in the oven at 350 F for at least an hour.  It is done when it not longer violently jiggles in the middle and begins to crack around the outside edges.  Don't worry if you stick your knife in the middle and it is still a little juicy looking in the middle. The eggs will continue to cook after they are out of the oven.

Then - let it sit.  Five to ten minutes.  Don't tend it or you will end up with soggy crust.  You will also note that my crust shrank here.  I did not chill my pie crust - a big no no.  Sorry Martha.

Then slice into that baby.  This one was cut a little too warm and the filling didn't have time to entirely set up.

This is a little better.  Serve with a dollop of nice, cool sour cream and a side salad.  Shazam! Dinner is served!
1. 2.
Share/Save/Bookmark 3.

Wednesday, February 23, 2011

Perfect Pie Pastry

Heck, use it for whatever you want, really.

As soon as she was legally able (and possibly before), my mother passed off the pastry making duties in our home.  She started out subtly, and eventually it just became my job.  You know how it goes "But honey, you make pastry sooo much better than I do!"  And there you are, sucked in.

At any rate, making good pastry has never seemed like a mystery to me.  I will not pretend to compete with French pastry chefs, but then again, I can make a pie, including the pastry and filling, from scratch, and not need to buy anything more exotic than lard.

If you follow a few simple steps, there's nothin' to it.

This is the recipe we use.  By 'we', I mean every woman in my family.  Bar none.  Don't ask us who Margaret is, we don't know.  Probably a neighbour at some point.  But we don't care.

This recipe is a little different from most in that it makes a quantity of pie crust (as we referred to it) and it uses milk.
Here's all you need to make it.  Don't forget the vinegar.  Yes, I said vinegar.

This is one egg in a one cup measuring cup.  Beat the egg up a little bit with a fork.  Then add enough milk to make one cup of liquid.
The vinegar coagulates the milk and you get this nifty clumping thing going on.  Don't worry.  It's supposed to do that.


From here, add four cups of all purpose flour, the baking powder, and the salt, into a mixer.

Back in the old days, I didn't have a mixer.  I had to do this by hand.  With a pastry cutter.  Don't know what one of those is?  What has this generation come to. My, my, my...

Next, bring out the lard.  Now here's the important part.  Use cold fat.  Vegetable shortening can be used, but it must be cold.

Next, slice it both lengthwise and widthwise.  This will give you the right size pieces to drop in the mixer.  Flour will fly.  Wear your apron.  Don't be a wuss.


Let it mix, on stir or a low speed, until you get a crumbly mixture.  Don't over mix.  Some bits will be bigger than others, but no huge glumps, please.  They are unsightly

Then slowly pour in the milk mixture, with the mixer running. 

Don't pour the milk mixer with the mixture running.  That could get messy.  And weird.

It will be sloshy.  It's OK.  It's supposed to do that.

Keep your mixer running and steadily add more flour, until the entire thing comes together in a ball.  Keep an eye on it.  It will happen fast.

Ta da!  Presto!  Turn off the mixer.  Quickly.  When you pull up the kneading hook, most of the dough should fall off.

Scrape the dough together, gently, and get it into a bag that you can close tightly around the ball.

Don't over squish the ball, the dough will get tough.

I don't recommend a zip top bag - I don't find they wrap around the dough close enough.

I don't like plastic wrap - I can just never seem to get it to work without making a mess in my fridge.

I usually do use an old bread bag.  See?  I am all about the environment.

Keep it in the fridge and use it chilled.

When you go to roll it out, let it sit 5-10 minutes and flour your surface and rolling pin well.

And most of all, don't worry if you don't turn out the perfect pie crust the first few hundred times you try.  I promise you, no one has ever eaten bad pie.
1. 2.
Share/Save/Bookmark 3.